Black Powder End Burners
![]()
Original Author: Anonymous
(unless he tells me otherwise)
Black Powder End Burners
![]()
Original Author: Anonymous
(unless he tells me otherwise)
Occasionally I want to fly something small, something that will stay within a restricted area. A composite will not always meet that requirement. The answer? A black powder engine.
For approx. eight years I have designed my own rockets and scratch built them from materials that are easily gotten hold of. Why spoil it and use a store bought engine?
I make my fuel using the standard black powder formula of 75% potassium nitrate, 15% charcoal (willow or air float) and 10% sulfur. I use a three pound rock tumbler loaded with two pounds of 50 cal. lead muzzle loader balls. For those who do not have a rock tumbler and do not wish to lay out the dollars ($75 - $100) at this time, there is another way that works well for small amounts of fuel. If you have the tumbler, you can skip the next three paragraphs but you might as well read them too.
Buy a pound of FFFg black powder from a gun shop or other place that caters to muzzle loaders. Measure out 1.5 ounces of powder and .5 ounce of potassium nitrate. Using a mortar and pestle of some sort, grind the potassium nitrate, 1/4 to 1/2 teaspoon at a time, into a powder as fine as talc or baby powder. Put the ground potassium nitrate into a moisture proof container and seal it. Using 1/4 to 1/2 teaspoon of FFFg black powder, grind it to the same consistency as the potassium nitrate. Remember, the finer the better.
Sounds like a lot of work, doesn't it? It is worth it to be able to make an end burning engine as good as or better than Estes engines. After all the powder has been reduced to as fine a state as possible, mix the potassium nitrate and FFFg and store in a moisture proof container. Now comes the fun part:
I don't own a lathe so I had to devise a method of making a nozzle former. The nozzle is critical. I use a casing that has an inside diameter of 1/2 inch. Get a nylon bar (brass or aluminum will work but the nylon takes more punishment longer) that will fit into the casing. Drill a 1/4 inch hole dead center in the end of the bar. Slice off a section 1/8 inch thick. This will be your centering ring for the nozzle. The rest of the bar will be your powder ram. Get a piece of hard wood, steel, brass or what ever you can find. This piece should be at least 1/2 inch thick. This will be the base plate. Drill a 1/4 inch hole in the center of the base plate.
Measure the thickness of the base plate, add 1/8 inch to it for the centering ring and 5/8 inch for the nozzle former itself. Cut a piece of 1/4 inch diameter brass rod to the required length. As you can see, the nozzle former will be 3/4 inch plus the thickness of the base plate. You will need a bench grinder and an electric drill. Put the piece of rod into the drill. Holding the spinning rod against the moving wheel of the bench grinder, grind the first 1/4 inch of the rod down to a diameter of 3/32 inch. The diameter is critical. The next step is to grind a tapered section behind the 3/32 diameter section. This section should be 3/8 inch in length. This will section will form the divergent section of the nozzle. Below is a very crude diagram of what you are trying to accomplish:
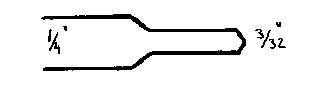
fig 1: 1/4" Throat Former
After doing this, stick the nozzle former into the hole in the base plate, slide the centering ring onto the nozzle former so that it drops down onto the base plate. I use a casing retainer made from a piece of PVC to keep the casing from splitting as the nozzle and fuel is rammed into the casing. The casing should fit snugly inside the PVC casing retainer. To get this to happen, I slit the PVC and file a gap of approx. 1/8 inch. The casing retainer is tightened down on the casing by using three small hose clamps. If you use a dry casing and are careful, you can skip this but you do so at your own risk. I have done without a casing retainer and used a dry casing and it worked.
Put approx. 1/2 teaspoon of fire clay or other ceramic material into the casing and ram it solid with a nylon, brass, aluminum or hard wood dowel. The nozzle material should come right up to the tip of the nozzle former. Make sure the ram has a hole in the end of it or you will ruin your nozzle former.To help the clay hold together, add a few drops of water to the clay in the storage container you keep it in. Mix it well. I use a fork to distribute the water throughout the clay.
I add 8% water to the powder before I ram it into the casing. This is not absolutely necessary, but I want the grain to be rock hard. I also make sure that I use a damp casing. I do that so that as the damp fuel dries, the casing also dries and clamps down onto the fuel to provide both a tight mechanical bond as well as a good chemical bond. You can use more powerful fuel.
Add the fuel 1/2 teaspoon at a time, ramming it into the casing with eight or ten blows from a hammer. Don't go too heavy on the hammer blows. Ram the fuel into the casing until it contains as much fuel as you want it to contain.
If you use the water in the fuel, the grain will dry hard as rock and will have adequate bridge strength to withstand the pressure without adding a forward closure (top plug) of clay. For an ejection charge, just add 1/8 to 1/4 teaspoon of FFFg powder on top of the fuel grain and either put a piece of masking tape over the top of the casing or use a paper end cap like is used in m-80's.
It may take you a few tries to get it all together, but the effort is worth it. I use these as well as black powder core burners when a composite engine is too powerful. My black powder core burners have been clocked at 360 mph.
Not bad for a country boy rolling his own!
I am providing this information for educational purposes only, in hope of furthering our hobby. It should be understood that attempting to replicate the above procedures is dangerous, and can lead to serious injury, death or property damage. This article should not be interpreted as an encouragement of any sort. However, if you do decide to reproduce any of the above, always put your safety first, and comply with all the laws applicable to your domicile. This will ensure that amateur rocketry remains safe and legal pastime for all of us.
Last update on 22-Aug-96 - Copyright 1996 Chris
Krstanovic (WR1F)